I have a confession. I'm about as far from green as you can get. I use Styrofoam plates occasionally, I am addicted to aerosol hairspray, my favorite kinds of vehicles are large ones such as trucks or SUVs and I don't recycle. As a matter of fact, the recycling bins that used to be issued quickly became storage bins/ laundry baskets.
I know, I know. It's not a good thing. I figure that I can at least rely on hippies to do all of that boring stuff for me. I do try to buy sustainable and organic foods (unless of course I'm making Blue Fin Tuna and Whale casserole.) and I am the queen of upcycling. I think it started when I was a little girl and I'd take my old underwear, cut the crotch area out and sew dresses for my Barbies out of the rest of the material. It sounds weird, but the underwear were clean and my Barbies always had the latest fashions.
Nowadays I've upgraded from using old butt parts from underwear and instead use clothes that are too old or ratty to donate. My sister does the same thing and we share a large bag of torn up clothes that we look through and craft with. She even profited off of this by making and selling small Ugly Doll-like plushies.
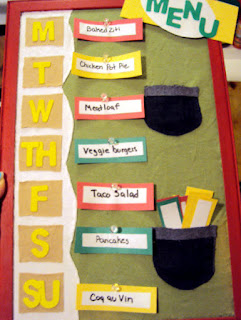
The most recent upcycled craft I made was out of an old corkboard, some old cloth from tshirts and jeans and red tempura paint. I made a menu board for my mom's apple themed kitchen. She loved it!
I will admit that this menu board is more whimsical and quirky than most available out there, but that's only because the kitchen (and the person) that I made this for is whimsical and quirky. You can make your own boards according to your own tastes and decor.
Upcycled Menu Board
 | 


No comments:
Post a Comment